Wednesday, December 18, 2013

Understanding and. Implementing Design Patterns - Facade

Understanding and Implementing design pattern - FACADE

Introduction

Design patterns are extensively used as a programming methodology to develop extensible and robust applications. In this article, we will discuss and understand a design pattern Facade and evaluate its benefits in making an application scalable.

Background

Let us understand the design pattern with the help of an example.
Consider a Customer ABC who wishes to apply for a house loan from CBC Bank.
public class Customer
{
    public string Name { get; set; }
    public string Occupation { get; set; }

    public Customer(string name, string occupation)
    {
        Name = name;
        Occupation = occupation;
    }
}
CBC Bank has a mortgage department which accepts house loan applications and evaluates their eligibility. Note that the customer only contacts the mortgage department to know whether he will be getting the loan or not.
Also, CBC Bank has two subdepartments:
  1. BankSubsytem that validates the customer background and determines if the customer is a valid customer.
  2. LoanSubsytem that determines the customer has no bad loans.
public class Bank_Subsystem
{
    public bool IsValidCustomer(Customer cust)
    {
        Console.WriteLine("Check " + cust.Name + " is valid");
        return true;
    }
}
    
public class Loan_Subsystem
{
    public bool HasNoBadLoan(Customer cust)
    {
        Console.WriteLine("Check " + cust.Name + " for bad loans");
        return true;
    }
}
As per CBC Bank policy, the Mortgage department will contact BankSubsystem and LoanSubsystem to determine if the customer is valid and has no bad loans. If the customer is approved by both departments, the Mortgage department reckons he is eligible for a house loan.
public class Mortgage_Facade
{
    private Bank_Subsystem bank;
    private Loan_Subsystem loan;
    
    public bool IsEligible(Customer cust)
    {
        bool isEligible = true;

        bank = new Bank_Subsystem();
        if (!bank.IsValidCustomer(cust))
        {
            isEligible = false;
        }

        loan = new Loan_Subsystem();
        if (isEligible && !loan.HasNoBadLoan(cust))
        {
            isEligible = false;
        }

        return isEligible;
    }
}
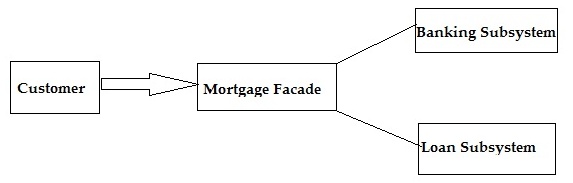
Note the interesting bit, the current interaction looks like this. The customer is not aware of either of the subsystems and the subsystems are not aware of the customer. Facade (the quintessential middlemen has all the right connections and does the job) knows about both the customer and the subsystems and does the task.
Sample Image
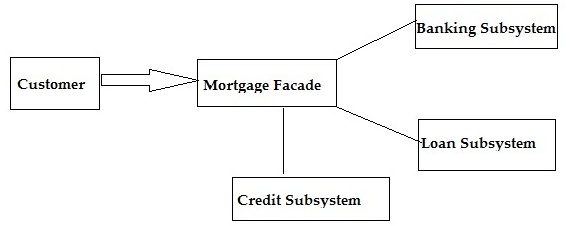
Consider the twist in the tale, a new regulation requires CBC Bank to also check the credit rating of the customer before approving the house loan. So, the Mortgage department should now also contact the credit subsystem which checks the credit worthiness of the customer.
public class Credit_Subsystem
{
    public bool HasGoodCredit(Customer customer)
    {
        Console.WriteLine("Check "+customer.Name + " for good credit");
        return true;
    }
}
Wow, so what do we do now? Rewrite the entire application from scratch as the bank's policy has changed, or worry about changing each class? Well, absolutely no. Here's the beauty of Facade. We just add the CreditSubsytem class to our project and extend Mortgage_Facade.cs.
public class Mortgage_Facade
{
    private Bank_Subsystem bank;
    private Loan_Subsystem loan;
    private Credit_Subsystem credit;

    public bool IsEligible(Customer cust)
    {
        bool isEligible = true;

        bank = new Bank_Subsystem();
        if (!bank.IsValidCustomer(cust))
        {
            isEligible = false;
        }

        loan = new Loan_Subsystem();
        if (isEligible && !loan.HasNoBadLoan(cust))
        {
            isEligible = false;
        }

        credit = new Credit_Subsystem();
        if (isEligible && !credit.HasGoodCredit(cust))
        {
            isEligible = false;
        }

        return isEligible;
    }
}
Note how the relationship between the entities has evolved. The customer still does not know about the subsystems and vice versa. It's the Facade that continues to do the magic.
Sample Image

Sunday, December 15, 2013

Understanding and Implementing Design Patterns - Abstract Factory

Understanding and Implementing Abstract Factory Pattern in C++


Introduction

This article aims at understanding and implementing Abstract Factory Pattern in C++.

Background

Abstract factory pattern in useful when the client needs to create objects which are somehow related. If we need to create the family of related or dependent objects, then we can use Abstract Factory Pattern. There are times when the client code does not know the exact type of object (out of many) it need to create and this pattern solves the problem by providing the client with a uniform interface to create multiple type of objects that are related by common theme.
This pattern is particularly useful when the client doesn't know exactly what type to create. As an example, let's say a Showroom exclusively selling cellphones gets a query for the smart phones made by Samsung. Here we don't know the exact type of object to be created (assuming all the information for a phone is wrapped in the form of a concrete object). But we do know that we are looking for smart phones that are manufactured by Samsung. This information can actually be utilized if our design has Abstract factory implementation.
So with this idea of Abstract Factory pattern, we will now try to create a design that will facilitate the creation of related objects. We will go ahead and write a rudimentary application for the scenario we just talked about.

Using the Code

Let us start with the GOFs representation of Abstract Factory Pattern:
abstract factory by gof Let's see what each class does here:
  • AbstractFactory: declares an interface for operations that create abstract products
  • ConcreteFactory: implements the operations to create concrete product objects
  • AbstractProduct: declares an interface for a type of product object
  • Product: defines a product object to be created by the corresponding concrete factory implements the AbstractProduct interface
  • Client: uses interfaces declared by AbstractFactory and AbstractProduct classes
Now let us focus on the problem at hand. We need to create the appropriate object containing the information about cell phone based on the user request of:
  1. Type of phone
  2. Phone manufacturer
For the sake of simplicity, let's assume we have 3 manufacturers:
  1. Nokia
  2. Samsung
  3. HTC
and there could be two types of phones:
  1. Smart Phones
  2. Dumb Phones
So with this information, we can safely say that we need three concrete factories (one for each manufacturer) and two sets of related products (one for smart and one for dumb).

Creating the Abstract Products

In our case, we need two abstract products ISmart and IDumb.
//ISmart interface
class ISmart
{
public:
    virtual std::string Name() = 0;
};

//IDumb interface
class IDumb
{
public:
    virtual std::string Name() = 0;
};

Creating the Concrete Products

Now let us go ahead and create some concrete products for IDumb:
class Asha : public IDumb
{
public:
    std::string Name()
    {
        return "Asha";
    }
};

class Primo : public IDumb
{
public:
    std::string Name()
    {
        return "Guru";
    }
};

class Genie : public IDumb
{
public:
    std::string Name()
    {
        return "Genie";
    }
};
Let's do the same for ISmart:
class GalaxyS2 : public ISmart
{
public:
    std::string Name()
    {
        return "GalaxyS2";
    }
};

class Titan : public ISmart
{
public:
    std::string Name()
    {
        return "Titan";
    }
};

class Lumia : public ISmart
{
public:
    std::string Name()
    {
        return "Lumia";
    }
};
So we have all the concrete classes ready for all the dumb phones and smart phones irrespective of their manufacturers.

Creating the Abstract Factory

Now the way we associate these Concrete products with their manufacturers is using the Concrete factories. But before having the concrete factories, we need to have an Abstract Factory.
//Header File
class APhoneFactory
{    
public:
    enum PHONE_FACTORIES
    {
        SAMSUNG,
        HTC,
        NOKIA
    };

    virtual ISmart* GetSmart() = 0;
    virtual IDumb* GetDumb() = 0;

    static APhoneFactory* CreateFactory(PHONE_FACTORIES factory);    
};

//CPP File
APhoneFactory* APhoneFactory::CreateFactory(PHONE_FACTORIES factory)
{
    if(factory == PHONE_FACTORIES::SAMSUNG)
    {
        return new SamsungFactory();
    }
    else if(factory == PHONE_FACTORIES::HTC)
    {
        return new HTCFactory();
    }
    else if(factory == PHONE_FACTORIES::NOKIA)
    {
        return new NokiaFactory();
    }
}

Creating the Concrete Factories

Now we can create our Concrete Factories for each manufacturer:
class SamsungFactory : public APhoneFactory
{
public:
    ISmart* GetSmart()
    {
        return new GalaxyS2();
    }

    IDumb* GetDumb()
    {
        return new Primo();
    }
};

class HTCFactory : public APhoneFactory
{
public:
    ISmart* GetSmart()
    {
        return new Titan();
    }

    IDumb* GetDumb()
    {
        return new Genie();
    }
};

class NokiaFactory : public APhoneFactory
{
public: 
    ISmart* GetSmart()
    {
        return new Lumia();
    }

    IDumb* GetDumb()
    {
        return new Asha();
    }
};

Creating the Client

Now we have all the Abstract product classes ready, all the Concrete Product classes ready. Our Abstract Factory is ready and all the Concrete Factories are ready. Now we can write client that will use this hierarchy of related products to create the products.
int main(int argc, char* argv[])
{
    APhoneFactory *factory = APhoneFactory::CreateFactory
                (APhoneFactory::PHONE_FACTORIES::SAMSUNG);

    cout << "Dumb phone from Samsung: " << factory->GetDumb()->Name() << "\n";
    delete factory->GetDumb(); //USe of smart pointer will get rid of these delete
    cout << "Smart phone from Samsung: " << factory->GetSmart()->Name() << "\n";
    delete factory->GetSmart(); //USe of smart pointer will get rid of these delete
    delete factory;
    getchar();

    factory = APhoneFactory::CreateFactory(APhoneFactory::PHONE_FACTORIES::HTC);
    cout << "Dumb phone from HTC: " << factory->GetDumb()->Name() << "\n";
    delete factory->GetDumb(); //USe of smart pointer will get rid of these delete
    cout << "Smart phone from HTC: " << factory->GetSmart()->Name() << "\n";
    delete factory->GetSmart(); //USe of smart pointer will get rid of these delete
    delete factory;
    getchar();
    
    factory = APhoneFactory::CreateFactory(APhoneFactory::PHONE_FACTORIES::NOKIA);
    cout << "Dumb phone from Nokia: " << factory->GetDumb()->Name() << "\n";
    delete factory->GetDumb(); //USe of smart pointer will get rid of these delete
    cout << "Smart phone from Nokia: " << factory->GetSmart()->Name() << "\n";    
    delete factory->GetSmart(); //USe of smart pointer will get rid of these delete
    getchar();

    return 0;
}
Now we can say we have a basic skeleton for the Abstract factory pattern ready. The concrete products here are not telling anything but names of products but they can contain more information too. Before we end the show, we can have a class diagram for the classes we created so that we can use this to map it with the GOFs diagram.
abstract factory by gof Note: Please refer to the source code for implementation. Stepping through the code will really help in understanding this concept better.

Points of Interest

Abstract factory pattern in very useful in GUI based applications where we need to create related GUI components. My example here is solely for the purpose of understanding and there is no way the "Cell-phone-information-system" can be designed this way (otherwise we will end up adding new classes every week). Please do let me know if I missed something. There is an exact same implementation for the Factory pattern in C# available too.

courtesy: http://www.codeproject.com/Articles/331304/Understanding-and-Implementing-Abstract-Factory-Pa
 

Saturday, December 14, 2013

Understanding and Implementing Design Patterns - Adapter Pattern

Adapter Pattern


Motivation

The adapter pattern is adapting between classes and objects. Like any adapter in the real world it is used to be an interface, a bridge between two objects. In real world we have adapters for power supplies, adapters for camera memory cards, and so on. Probably everyone have seen some adapters for memory cards. If you can not plug in the camera memory in your laptop you can use and adapter. You plug the camera memory in the adapter and the adapter in to laptop slot. That's it, it's really simple.
What about software development? It's the same. Can you imagine an situation when you have some class expecting some type of object and you have an object offering the same features, but exposing a different interface? Of course, you want to use both of them so you don't to implement again one of them, and you don't want to change existing classes, so why not create an adapter...

Intent

  • Convert the interface of a class into another interface clients expect.
  • Adapter lets classes work together, that could not otherwise because of incompatible interfaces.

Implementation

The figure below shows a UML class diagram for the Adapter Pattern:
Adapter  Pattern Implementation - UML Class Diagram

The classes/objects participating in adapter pattern:
  • Target - defines the domain-specific interface that Client uses.
  • Adapter - adapts the interface Adaptee to the Target interface.
  • Adaptee - defines an existing interface that needs adapting.
  • Client - collaborates with objects conforming to the Target interface.


Applicability & Examples

The visitor pattern is used when:
  • When you have a class(Target) that invokes methods defined in an interface and you have a another class(Adapter) that doesn't implement the interface but implements the operations that should be invoked from the first class through the interface. You can change none of the existing code. The adapter will implement the interface and will be the bridge between the 2 classes.
  • When you write a class (Target) for a generic use relying on some general interfaces and you have some implemented classes, not implementing the interface, that needs to be invoked by the Target class.
Adapters are encountered everywhere. From real world adapters to software adapters
  • Non Software Examples of Adapter Patterns : Power Supply Adapters, card readers and adapters, ...
  • Software Examples of Adapter Patterns: Wrappers used to adopt 3rd parties libraries and frameworks - most of the applications using third party libraries use adapters as a middle layer between the application and the 3rd party library to decouple the application from the library. If another library has to be used only an adapter for the new library is required without having to change the application code.

Specific problems and implementation


Objects Adapters - Based on Delegation

Objects Adapters are the classical example of the adapter pattern. It uses composition, the Adaptee delegates the calls to Adaptee (opossed to class adapters which extends the Adaptee). This behaviour gives us a few advantages over the class adapters(however the class adapters can be implemented in languages allowing multiple inheritance). The main advantage is that the Adapter adapts not only the Adpatee but all its subclasses. All it's subclasses with one "small" restriction: all the subclasses which don't add new methods, because the used mechanism is delegation. So for any new method the Adapter must be changed or extended to expose the new methods as well. The main disadvantage is that it requires to write all the code for delegating all the necessary requests tot the Adaptee.

UML Diagram


Class adapters can be implemented in languages supporting multiple inheritance(Java, C# or PHP does not support multiple inheritance). Thus, such adapters can not be easy implemented in Java, C# or VB.NET. Class adapter uses inheritance instead of composition. It means that instead of delegating the calls to the Adaptee, it subclasses it. In conclusion it must subclass both the Target and the Adaptee. There are advantages and disadvantages:
  • It adapts the specific Adaptee class. The class it extends. If that one is subclassed it can not be adapted by the existing adapter.
  • It doesn't require all the code required for delegation, which must be written for an Object Adapter.
If the Target is represented by an interface instead of a class then we can talk about "class" adapters, because we can implement as many interfaces as we want.

How Much the Adapter Should Do?

This question has a really simple response: it should do how much it has to in order to adapt. It's very simple, if the Target and Adaptee are similar then the adapter has just to delegate the requests from the Target to the Adaptee. If Target and Adaptee are not similar, then the adapter might have to convert the data structures between those and to implement the operations required by the Target but not implemented by the Adaptee.

Two-Ways Adapters

The Two-Ways Adapters are adapters that implements both interfaces of Target and Adaptee. The adapted object can be used as Target in new systems dealing with Target classes or as Adaptee in other systems dealing with Adaptee classes. Going further on this line of thinking, we can have adapters implementing n interfaces, adapting to n systems. Two-way adapters and n-way adapters are hard to implement in systems not supporting multiple inheritance. If adapter has to extend the Target class it can not extent another class like Adaptee, so the Adaptee should be an interface and all the calls should be delegated from the adapter to the Adaptee object.

Adapter Pattern and Strategy Pattern

Adapter Pattern and Strategy Pattern - there are many cases when the adapter can play the role of the Strategy Pattern. If we have several modules implementing the same functionality and we wrote adapters for them, the adapters are implementing the same interface. We can simply replace the adapters objects at run time because they implements the same interface.
* Example of `adapter' design pattern
* Copyright (C) 2011 Radek Pazdera
* This program is free software: you can redistribute it and/or modify
* it under the terms of the GNU General Public License as published by
* the Free Software Foundation, either version 3 of the License, or
* (at your option) any later version.
* This program is distributed in the hope that it will be useful,
* but WITHOUT ANY WARRANTY; without even the implied warranty of
* MERCHANTABILITY or FITNESS FOR A PARTICULAR PURPOSE. See the
* GNU General Public License for more details.
* You should have received a copy of the GNU General Public License
* along with this program. If not, see .
*/

#include
#include
 
typedef int Cable; // wire with electrons :-)
 
/* Adaptee (source) interface */
class EuropeanSocketInterface
{
public:
virtual int voltage() = 0;
 
virtual Cable live() = 0;
virtual Cable neutral() = 0;
virtual Cable earth() = 0;
};
 
/* Adaptee */
class Socket : public EuropeanSocketInterface
{
public:
int voltage() { return 230; }
 
Cable live() { return 1; }
Cable neutral() { return -1; }
Cable earth() { return 0; }
};
 
/* Target interface */
class USASocketInterface
{
public:
virtual int voltage() = 0;
 
virtual Cable live() = 0;
virtual Cable neutral() = 0;
};
 
/* The Adapter */
class Adapter : public USASocketInterface
{
EuropeanSocketInterface* socket;
 
public:
void plugIn(EuropeanSocketInterface* outlet)
{
socket = outlet;
}
 
int voltage() { return 110; }
Cable live() { return socket->live(); }
Cable neutral() { return socket->neutral(); }
};
 
/* Client */
class ElectricKettle
{
USASocketInterface* power;
 
public:
void plugIn(USASocketInterface* supply)
{
power = supply;
}
 
void boil()
{
if (power->voltage() > 110)
{
std::cout << "Kettle is on fire!" << std::endl;
return;
}
 
if (power->live() == 1 && power->neutral() == -1)
{
std::cout << "Coffee time!" << std::endl;
}
}
};
 
 
int main()
{
Socket* socket = new Socket;
Adapter* adapter = new Adapter;
ElectricKettle* kettle = new ElectricKettle;
 
/* Pluging in. */
adapter->plugIn(socket);
kettle->plugIn(adapter);
 
/* Having coffee */
kettle->boil();
 
return 0;
}

Tuesday, December 10, 2013

Understanding and Implementing Design Patterns - Strategy Pattern

Extending Functionality with the Strategy Pattern


The strategy pattern enables the functionality of an application to be easily extended or modified to cope with new or changed requirements, as shown in the following example.
The code below shows the OrderProcess class which is responsible for processing the payment of an order as shown in the ProcessOrderPayment method
    public class OrderProcess
    {
        private readonly IOrderRepository repository;

        public OrderProcess(IOrderRepository repository)
        {
            this.repository = repository;
        }

        public void ProcessOrderPayment(Order order, PaymentDetails paymentDetails)
        {
            //Work out the order's price
            CalculateOrderPrice(order);

            //Process the payment
            switch (paymentDetails.Method)
            {
                case PaymentMethod.CreditCard:
                    ProcessCreditCardPayment(order.Price, paymentDetails);
                    order.PaymentTaken = true;
                    break;
                case PaymentMethod.Cheque:
                    ProcessChequePayment(order.Price, paymentDetails);
                    order.PaymentTaken = true;
                    break;
            }

            //Persist changes to the order
            repository.Save(order);
        }

        private void CalculateOrderPrice(Order order)
        {
            //Code to calculate order price
            order.Price = 500;
        }

        private void ProcessCreditCardPayment(int amount, PaymentDetails paymentDetails)
        {
            //Code to process credit card payment
        }

        private void ProcessChequePayment(int amount, PaymentDetails paymentDetails)
        {
            //Code to process cheque payment
        }
    }
The current implementation has the following issues
  • If a payment method is added the OrderProcess class will have to be changed, therefore violating the open closed principal
  • If the implementation of a payment method is changed, e.g. a new payment service provider used to process credit card payments the OrderProcess class is not isolated from this change.
  • The class is hard to unit test as it has numerous responsibilities and therefore it is difficult to setup tests to ensure all possible code paths are tested
  • The OrderProcess class will get very large and complex if more payment methods are added
To solve the problems listed above we need to isolate the functionality that is most likely to change, in our example this is the processing of payments, this can be achieve by using the strategy pattern; below is the description from the GoF book.
“Define a family of algorithms, encapsulate each one, and make them interchangeable. Strategy lets the algorithm vary independently”
Shown below is the PaymentStrategyBase class which is the base class for the various payment mechanisms.
    public abstract class PaymentStrategyBase
    {
        protected PaymentDetails PaymentDetails { getprivate set; }

        protected PaymentStrategyBase(PaymentDetails paymentDetails)
        {
            PaymentDetails = paymentDetails;
        }

        public abstract void Process(int amount);
    }
Next shown are the implementations of the strategies for handling credit card payments and cheque payments.
    public class CreditCardPaymentStrategy : PaymentStrategyBase
    {
        public CreditCardPaymentStrategy(PaymentDetails paymentDetails) : base(paymentDetails){}

        public override void Process(int amount)
        {
            //Process credit card payment
        }
    }
    public class ChequePaymentStrategy : PaymentStrategyBase
    {
        public ChequePaymentStrategy(PaymentDetails paymentDetails) : base(paymentDetails) { }

        public override void Process(int amount)
        {
            //Process cheque payment
        }
    }
Below is the modified OrderProcess class which now uses the new classes
    public class OrderProcess
    {
        private readonly IOrderRepository repository;

        public OrderProcess(IOrderRepository repository)
        {
            this.repository = repository;
        }

        public void ProcessOrderPayment(Order order, PaymentStrategyBase payment)
        {
            //Work out the order's price
            CalculateOrderPrice(order);

            //Process the payment
            payment.Process(order.Price);
            order.PaymentTaken = true;

            //Persist changes to the order
            repository.Save(order);
        }

        private void CalculateOrderPrice(Order order)
        {
            //Code to calculate order price
            order.Price = 500;
        }
    }
As you can see the OrderProcess class is now a lot simpler so therefore is much easier to maintain and write unit tests for, also the different strategies are simple to maintain and test. Now the ProcessOrderPayment method has no knowledge of how the payment is being processed so therefore a new payment strategy implementation could be added without modifying the OrderProcess class or the implementation of an existing strategy changed. For example if a new requirement was that the application needs to be able to process payments via PayPal we could implement the class shown below.
    public class PayPalPaymentStrategy : PaymentStrategyBase
    {
        public PayPalPaymentStrategy(PaymentDetails paymentDetails) : base(paymentDetails) { }

        public override void Process(int amount)
        {
            //Process paypal payment
        }
    }
For the application to make use of the new PayPalPaymentStrategy class we would need to ensure that the code that uses the OrderProcess class instantiates the correct strategy to pass to the ProcessOrderPayment method, this creation logic could be encapsulated within a factory.

Thursday, November 28, 2013

Singly linked list - Kth node from the end

Singly Linked List - K-th Node from End


Problem: Get the Kth node from end of a linked list. It counts from 1 here, so the 1st node from end is the tail of list. 

For instance, given a linked list with 6 nodes, whose value are 1, 2, 3, 4, 5, 6, its 3rd node from end is the node with value 4.

A node in the list is defined as:

struct ListNode
{
    int       m_nValue;
    ListNode* m_pNext;
};

Analysis: In a list with n nodes, its kth node from end should be the (n-k+1)th node from its head. Therefore, if we know the number of nodes n in a list, we can get the required node with n-k+1 steps from its head. How to get the number n? It is easy if we scan the whole list from beginning to end.

The solution above needs to scan a list twice: We get the total number of nodes with the first scan, and reach the kth node from end with the second scan. Unfortunately, interviewers usually expect a solution which only scans a list once.

We have a better solution to get the kth node from end with two pointers. Firstly we move a pointer (denoted as P1) k-1 steps beginning from the head of a list. And then we move another pointer (denoted as P2) beginning from the head, and continue moving the P1 forward at same speed. Since the distance of these two pointers is always k-1, P2 reaches the kth node from end when P1 reaches the tail of a list. It scans a list only once, and it is more efficient than the previous solution.

Figure 1: Get the 3rd node from end of a list with 6 nodes

It simulates the process to get the 3rd node from end of a list with 6 nodes in Figure 1. We firstly move P1 2 steps (2=3-1) to reach the 3rd node (Figure 1-a). Then P2 points to the head of a list (Figure 1-b). We move two pointers at the same speed, when the P1 reaches the tail, what P2 points is the 3rd node from end (Figure 1-c).

The sample code of the solutions with two pointers is shown below:

ListNode* FindKthToTail(ListNode* pListHead, unsigned int k)
{
    if(pListHead == NULL || k == 0)
        return NULL;

    ListNode *pAhead = pListHead;
    ListNode *pBehind = NULL;

    for(unsigned int i = 0; i < k - 1; ++ i)
    {
        if(pAhead->m_pNext != NULL)
            pAhead = pAhead->m_pNext;
        else
        {
            return NULL;
        }
    }

    pBehind = pListHead;
    while(pAhead->m_pNext != NULL)
    {
        pAhead = pAhead->m_pNext;
        pBehind = pBehind->m_pNext;
    }

    return pBehind;
}

The discussion about this problem is included in my book , with some revisions. You may find the details of this book on Amazon.com, orApress.